


You know you need your corporate video, but times being what they are, you can’t get the necessary crew together. Fear not! Your video marketing needs don’t have to come to a screeching halt. Here is a helpful guide to doing it yourself.
The fact is in the past three months I’ve learned a lot of things through trial and error about being my own videographer, no crew, or crew via video calls….Here I have included the right equipment to use in the list below.
So I am happy to pass that knowledge onto you.
Here are my recommendations for your kick-a** home studio set-up for shooting video blogs, video calls, and even the greatest conference calls ever seen.
1. Lighting:
Let’s start with lighting. Lighting is an important element of any video – and often a forgotten or dismissed one. Trust me when I tell you the natural light filtering in from your 2×3 foot window is not enough. So here are two choices
a. Ring Light / Beauty Light
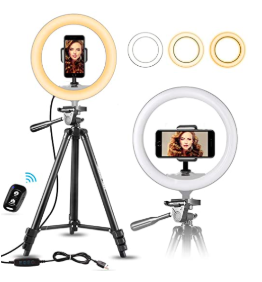

This light is the easiest to operate, but it’s primarily used for close up shots, like you might see for those that vlog about make-up. It doesn’t do much in the way of lighting anything in the background.
b. Three Point Lighting Kit
https://www.amazon.com/dp/B07YDHL3R2/ref=twister_B081F87XPX?_encoding=UTF8&psc=1
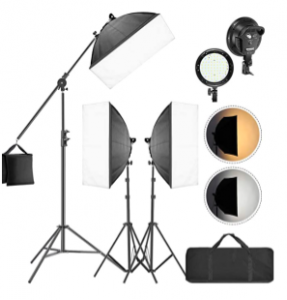

This is much more useful for capturing you and the background while adding depth and space. Personally, I like a three-point color variant LED light with soft boxes.
The nice thing is they are lightweight, have a compact case, and have a variable color temp you can adjust them to match time of day or use them in other rooms.
I can tell you professionally almost every interview I have ever done, was built on a 3-point lighting system. As a result, that is my most comfortable recommendation.
Your KEY light is your strongest light and should be on the side of your face pointing away from the camera. The KEY light should hit about 75% of your face and should be positioned roughly at a 45-degree angle to the camera.
Your FILL light is supplemental to the key. It should be medium intensity compared to your KEY light. This softens the shadows on a subject’s face on the 25% that the key misses. They should not be at the same brightness. You naturally would want some contrast on your face. The FILL should be 50%-75% of the intensity of the KEY.
Your BACKLIGHT is exactly that. It is behind you separating you from the background. This is the trickiest of all. Be careful to watch for lens flairs in the camera and to not create strange shadows behind you. This is paramount of a professional-looking interview as it helps make you POP on camera.
A general rule of thumb when setting up lights is half the distance to the subject, twice the intensity. So If a subject is 3 feet from the light, and the light is brought in to 1.5 feet from the subject, the light is now twice as bright on the subject’s face.
Softer lights, with white silks or screens in front of them, are more favorable on our skin. They hide blemishes that HD cameras see clearly.
You will also need to keep the lights height in mind. You want them to mimic the sun, which is above us. So lights higher up, pointed down at around 45 degrees create a better look than lights directly in front, which creates a “headlight” look.
It will take some experimenting in the space to figure out the desired look. Lighting is like cooking a meal, not baking bread. You review the recipe, prepare the ingredients, but then it’s up to the chef to find the right amount of seasoning per dish to complement each course.
2. Microphone
Next, you’re gonna want to be heard – properly. Camera mics create echo and “tinny” sounds, so a proper, professional microphone is ideal.
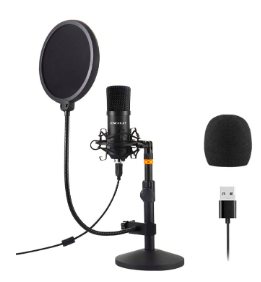

This one has a case in case you want to store it safely or move to alternate locations.
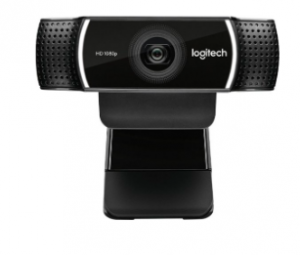
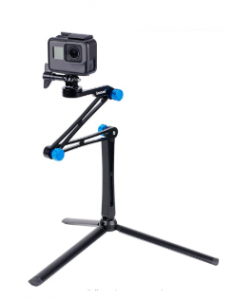
3. Camera
And, of course, you’re gonna want to be seen. And you don’t want to get too crazy with the price. Check this one out.

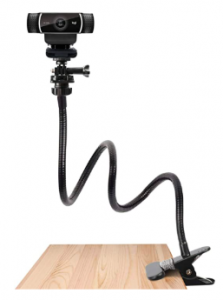
4. Camera stand
Since you most likely don’t have a full-time camera person to point and shoot, you’re gonna want to keep your camera steady. Two options are to go either Tripod or Clamp. It’s purely your choice, but here’s a great adjustable tripod.

And here’s a clamp that can affix right to your desk.

If you have any questions about what else you can do to make great professional-looking videos, visit us at www.ripmediagroup.com.